Wednesday, December 29, 2010
Pins and Needles
I LOVE their dies, they allow you to cut, emboss and stencil all in one. But, one of the most awesome features is, that they are compatiable with most die cut systems like the Cuttlebug.
If your interested in giving it a go, click HERE for all the details. Pin It
Wednesday, December 15, 2010
Money Cards
Pin It
Monday, December 13, 2010
Center piece
Well, here is what I came up with...a center piece.
Thursday, December 9, 2010
Scraplifting
here is Abby's layout
Wednesday, December 8, 2010
Rachel Lee
Pin It
Tuesday, December 7, 2010
Count Down To Christmas
| Close up of tree I used Stickles and followed the pattern in the patter to add some bling |
 |
| the hidden pocket the numbers attach with velco |
Saturday, December 4, 2010
November 24 Hour Challenge
Tuesday, November 30, 2010
There's a DT Call
If you don't want to commit to a Design Team, please still pop over and play along. The challenges are great and the prizes are even better! Right now they are having 3 giveaways, head on over to their blog for all the details. Pin It
Expecting
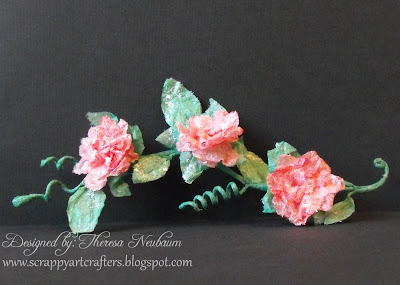
 I have really slacked this month on the challenges over at Scrappin N Chattin. I figured I better at least get one thing submitted. One of the requirements were to repeat the same picture. I used pictures of my daughter in law, she is expecting my granddaughter any day now. You really can't tell in the photos, but she is HUGE (sorry Kim...lol). I used one of the new flower vines that I made out of coffee filters (if you haven't seen the video, click on the "Tutorials" tab right under my header)
Saturday, November 20, 2010
Tea Roses
Upon returning home, I dug out the supplies and got busy. Here is my fisished product. The flowers are roughly an inch in a half, the total vine is roughly 7 inches long. I added tinsel glitter for that added bling we all love. Pin It
Thursday, November 11, 2010
Challenge Blogs Blog Hop
Tuesday, November 9, 2010
Place Setting
For The Cuttlebug Spot this week, we are continuing the Thankgiving theme. Nilda has ask us to make things for the dinner table. I made place settings and napkin rings. I kept the design matching last weeks invitation. I just love all the fall colors!
Be sure to head over the The Cuttlebug Spot and see what the other DT members have created, plus, enter for your chance at this weeks prize.
Saturday, November 6, 2010
Love Canvas
I had picked up some little cavas at Michaels in the dollar bins. They have been tucked away all forgotten for more than a year. They had nautical screen printing on them, but I figured I coulds still alter them....afterall....they were only a dollar. This is what they looked like when I bought them.
.JPG)
Here is the after
Be sure to head over to TPV to see what the DT and the other members have created. There is a great prize to be had this week!
Pin It
Friday, November 5, 2010
Smoking
Many illnesses are related to smoking. Heart Disease (which I suffer with), lung cancer (which my grandfather died from and my sister suffers from), plus many many other health issues. You would think that these things would make a person not want to smoke, but smoking is a drug, just as bad as some of the illegal drugs running rampant on the streets. Smoking is HIGHLY addictive and the HARDEST thing I have ever tried to conquer!
Today is day 6 of being smoke free. I think I'm through the rough withdrawls. The tension in the neck and shoulders, snapping at anyone near me. Now I have to get through the wanting. I don't feel that I need it, I just want one. Pin It
Monday, November 1, 2010
Invitations
I had sat down at my craft table several times throughout the week, and nothing was coming to me....ugh! I was beginning to get really nervous thinking I wasn't going to be able to create anything to turn in this week. Then last night, this vision came to me....yep....no joke!
 I started with a 5x5 scalloped flat card. I inked the edges and spritzed it with Glimmer Mist, then ran it through the Cuttlebug with the Swirls embossing folder. I cut a piece of cardstock 4.5x4.5, ran it through the Cuttlebug with the Textile embossing folder, then inked the raised design and adhered it to the card base. I printed the information on a neutral cardstock, then cut it out using a Spellbinders Lable 2 die. You can also use those in your Cuttlebug.
For the bouquet, I took a length of cardstock and rolled it up, gluing the bottom. From the top, I cut strips going down. I rolled up the strips to make paper tendrils. I cut the leaves using the Cricut Create A Critter cartridge, inked them then adhered them in the center of all the curled up strips and adjusted them until I liked the way they looked. I cut different size flowers also using the Create A Critter cartridge. I inked them and also embossed them using the swirls and swiss dots folders. Curled them up a bit, added some gems, then adhered them.
close up of bouquet
 Pin It
Monday, October 25, 2010
Danger!
Inside
 (not sure why the difference in coloring, I took the photos in the same location. It is made with Black Magic cardstock with green core.)
 Friday, October 22, 2010
Sweet Treats

I cut the skull using the Wall Decor and More cartridge by Cricut. Inking it up to give him an aged spooky look. I stamped the word "poison" on orange cardstock and crinkled it up, then inked it. I drew the cross bones free hand and also inked them. I adhered the crossbones and skull with pop dots for a 3d look.
I stamped the baggie with a spider using Staz On ink, then filled it with candy (it would have looked better with those eye ball gum drops, but I didn't have any on hand) I then folded the cardstock in half and attached with staples to complete the packaged look.
close up

Be sure to head over to TPV to see what the awesome design team and other members have created.
Thursday, October 21, 2010
Butterfly Kisses
This layout has been on my craft table for days, and last night I made up my mind I was going to finish it and stop just looking at it. I made it for one of the monthly challenges at Scrappin N Chattin. We had to used rolled paper in some fashion. Using cardstock by Webster Pages, I cut out a section then rolled the paper. I attached the photo to another piece of cardstock and adhered it to the back side. I cut the circle with George and Basic Shapes Cricut cartridge then randomly added glitter. I made the flowers (video coming soon). Of course I had to add bling. The butterflies were floating around in my stash, I don't remember who they are by. With tiny alphas, I spelled out "Butterfly Kisses". I'm very happy with the way it turned out.
Sunday, October 17, 2010
SPOOKY

I cut the banners at 3 inches, using the Country Life Cricut cartridge. It's kinda hard to see in the picture that I ran it through the Cuttlebug with the spots and dots embossing folder, then inked the edges and highlighted the embossed parts. The bat is a Cuttlebug die, the alphas are boxed brush by Sizzix that I also ran through the Cuttlebug. The skulls are from the Birthday Cakes Cricut cartridge and are cut at 2 1/2 inches
I used an eyelet at the bottom of the banner and the top of the skull, then used black floss to attach them. I then tied on orange and black fuzzy fibers. With a jump ring, I added a bead to the bottom of the skull.
Thanks for stopping by, and be sure to go check out the other Design Teams spook-tacular projects HERE
Pin ItMonday, October 11, 2010
Treat Holders
This week The Cuttlebug Spot Design Team made treat holders. I am in awe of what the others made, so be sure to head over there and check them all out.
For my treat holder, I used Core'dinations Black Magic cardstock. I ran the front of it through the Cuttlebug with the Spots & Dots embossing folder. I then sanded the embossed areas so the orange would show through. I cut the skull and word danger from Cricuts Wall Decor and More cartridge. The handle I used a border punch on both sides, then ran it through the Cuttlebug with the Swiss Dots embossing folder, again sanding it so the orange would show. I stapled orange and black fibers to each side. I crickled up thin strips of black paper for the inside.
Pin ItSaturday, October 9, 2010
The Winner
QUESTION:
It is against the US Federal Government to throw this away, however, 7 MILLION get thrown away each day. What is it?
ANSWER:
Pennies
Have you done the math? That is 70,000 dollars EACH day! wow! wish I could find all of them...LOL.
I put in everyones name in a dish who stated pennies, and mixed them all up....then mixed them somemore....and mixed them yet again....and.....
the winner is............
Scrapping Galaxy!
Congrats, please email me your snail mail info to scrappyartcrafters at yahoo dot com, and I will get the pins on their way to you.
Thanks everyone for playing along! Pin It
Wednesday, October 6, 2010
Feeling Good
I had a stent put in my right artery, which was 70-80% blocked, and a balloon in the left side, which was 99% blocked. The reason for the balloon instead of a stent on the left side is due to my artieries being very small. There is another blockage at 75%, but it too is to small for any type of correction.
I've always said my mom and dad didn't put me together right....LOL!
I am making some life changing changes, #1 is to stop smoking. This has been the hardest thing for me, I have been smoking for 30 years. I feel I am doing very well. I have only smoked 4 cigarettes since Sunday evening. I know each day will get easier for me.
I also have to change my eating habits. I don't like alot of foods, and really think it is a waste that God created us to have to eat to survive. I get all my calories each day from soda....not good huh? anyway, my mom bought me this awesome heart healthy cookbook. I have had 3 meals out of it which were all wonderful.
I will now take it day by day! Pin It
Monday, October 4, 2010
It's Time!
For my very first Design Team reveal with The Cuttlebug Spot. I am so excited to have been chosen to join the team. I LOVE my Cuttlebug!
Being that October is Breast Cancer Awareness month, to represent the "Power of Women", we designed our projects around that theme. Here is my creation.

I have chosen to make a card. I set the card base up on the Cricut Expression to cut the oval shape out. I had to do the same for the pink cardstock. With the D'Vine Swirl embossing plate, I embossed the pink cardstock, then rubbed it lightly with a pale pink ink pad, highlighting the embossed swirls.
With white cardstock, I cut out a oval frame. Using the Swiss Dots embossing folder and again rubbing lightly with a pale pink ink pad.
I made the ribbon and added sprays of foliage that I punched using a Martha Stewart punch, then added a small Prima rose. Notice that stick pin?, one of my new creations. You can check more out in my shop HERE.Lastly, I printed the sentiment on an oval shape and adhered it to the card.
Be sure to check out what the other talented designers have created, you can find a link to their blogs on the right side bar.
Thanks for looking!
Pin It
Sunday, October 3, 2010
Trivia Giveaway
All you have to do, is to leave a comment with the correct answer. I will then put all the names of those with the correct answer in a drawing. You have until Friday October 8th at midnight your time zone to enter. (I am unable to ship this item international...for this I am very sorry)
Now, on to the question.
It is against the US Federal Government to throw this away, however, 7 MILLION get thrown away each day. What is it?
Good Luck!
Pin ItMonday, September 27, 2010
DCWV Giveaway!

Midnight Spell Stack
Amber Autumn Stack
Happy Hauntings Cricut Cartridge if so, head over to their blog to learn what you have to do for your chance to win.
Friday, September 24, 2010
Exciting News!
Hope to see you there!

Texas Outlaw

Here is what I came up with incorporating this weeks sketch from Sassy Lil Sketches.
The "C" is to incorporate "cinema" so for the title I based it on the old western Texas Outlaw. I think it fits perfectly with this picture of Dax, after all, he is from Texas...lol. Pin It
Wednesday, September 22, 2010
Look What You Could Win!
 Is that scrap-licous or what?! How do you win it you ask? Well, just head over to The Paper Variety and find out! While there, be sure to check out ALL the inspiration...those gals are uber talented!
Pin It
Saturday, September 18, 2010
TPV's First Challenge

I have chosen to do a layout, because that is what I make the most. I used old scrap papers that I have been hording. The photo is of my oldest sister Marie taken by the tree in my front yard during her recent visit.
Thanks for stopping by!
Friday, September 17, 2010
MME Challenge 15
I decided to use some of their older stuff. Like, the Complete Boy paper collection and some Signature Suite cardstock sayings. I absolutely LOVE the papers in the collection.

My Take
I am also using this layout for one of the SC10 challenges, a monthly challenge that is hosted over at Scrappin-N-Chattin. One of the five challeges is to use a black and white photo. I immediately thought of this photo. I so LOVE this picture of Rick and Dax when Dax was just a few days old. I have had it framed for over 3 years, just have never scrapped it until now. I'm pretty happy with the way it turned out.
Tuesday, September 14, 2010
Scrappy Spaces
I thought I would get around to making a video of it someday, but I don't think Lori will wait on her giveaway until I get one done...especially since her deadline is tomorrow...LOL. She recently had a room re-do, and in celebration of getting her room finished, she is hosting a giveaway on her blog for sharing your space. Now my space is NO where near as beautiful as hers, so be sure to head over to her blog to check out her awesome space. http://lorimancini.typepad.com/ .
Now on to my space!
Sunday, September 12, 2010
SNC September Sketch
 This was Dax's second Halloween, he wasn't quite 2 years old. While shopping for a costume, he seen Scooby Doo and that was all she wrote! He had to have the puppy! He loved this costume so much that he still wore it after Halloween until it just wouldn't fit him anymore. I actually think we still have the hat part somewhere.
I used random papers that I have had in my stash forever, so I can't tell you who they are by.
Thursday, September 9, 2010
5 Pattern Papers & Sketch Challenge

So I scoured my new photos and thought these would be great with the Cosmo Cricket Snorkle line that I had won from Scrappin N Chattin. Here is what I came up with.
Saturday, September 4, 2010
"At the Fair"
At Jitter Buggin Challenge, we are to follow this weeks sketch of course, and a favorite something, which is the fair. I LOVE walking around the fair and seeing all that the vendors have to offer. But by far, my favorite is the animal judging. It is hilarious to watch the little kids running around like crazy trying to catch their prized roosters and chickens!!! Also, we were to use two of our favorite colors. I've always loved the colors blue and red together.
The pattern papers are Complete Boy by My Minds Eye, I just love the colors in this line! The front base of the card, I used Core'dinations Black Magic with the red core. I ran it through the Cuttlebug with the spots and dots embossing folder, then sanded for the red to show through. I also made the rooster using the same cardstock.
I cut the rooster from Animal Kingdom Cricut cartridge. Actually, it was the chicken, but, I thought it looked more like a rooster than the rooster one. I cut it out 3 times in 3 colors to piece him together. (sure wish all the carts had the layering function like CAC) anyway, for his eyes, I used the old fashion hole punch, you know, the one you hit with the hammer. I used the large hole for the white, and the small hole for the black. And of course, I had to use pop dots for dimension. I think it is adorable!
The ribbon I made with the Office Help cart. I cut out the badge twice, and adhered the ribbon between them. Then topped it with the starburst and a circle. I cut the 1st from the Ashlyn's Alphabet cartridge. For the banner, I just cut elongated triangles by hand and added alpha rub ons, added some white embrodery floss for the tabs and used pop dots for more dimension.
All in all, I like how it turned out.
Thursday, September 2, 2010
Made Top 3!


Now I am in the drawing for a new Cricut Cartridge...whewwww whoooo! Head on over to the blog to learn the details of this weeks challenge...who knows....maybe you'll get Top 3 and have a chance for a new cartridge too.
Pin ItTuesday, August 31, 2010
Who doesn't like a giveaway????
We all are getting excited as the kick off date is getting closer for The Paper Variety (http://www.thepapervariety.blogspot.com ). A new blog created by the talented Abby and Suzanne, designed for all of us paper crafters in mind. There will be something for everyone, whether you make layouts, cards, or other paper projects. It will be full of awesome challenges, tutorials, and fun and games.
To celebrate the announcement of the new Design Team Memebers, they are giving away the life is good kit by Echo Park. If you haven't seen this kit yet, take a look....it is full of lusiousness!

For your chance to snag this kit, head on over to The Paper Variety to learn what you have to do to get into the drawing. Pin It


